
| ☰ See All Chapters |
Cucumber Selenium Maven
In this tutorial you will learn to create cucumber example using selenium for step definitions. To create project and to manage libraries and dependencies we use maven. So it will be maven project. Please make sure you have maven installed in your system before creating this example.
In this example, you we will automate the following steps:
Launch Google Chrome browser.
Click on Login Option
Enter username and password.
Click on Login button
Verify successful login
Follow the below steps to create the example. You might not quite understand everything that happens here just yet, but try not to let that worry you. You will learn all the details in next chapters.
Step1: Create java Project using Maven
In the command prompt execute the following maven command to generate Maven supported Java project named as “CucumberSeleniumExampleUsingMaven”.
mvn archetype:generate -DgroupId=com.tools4testing -DartifactId=CucumberSeleniumExampleUsingMaven -DarchetypeArtifactId=maven-archetype-quickstart -DinteractiveMode=false
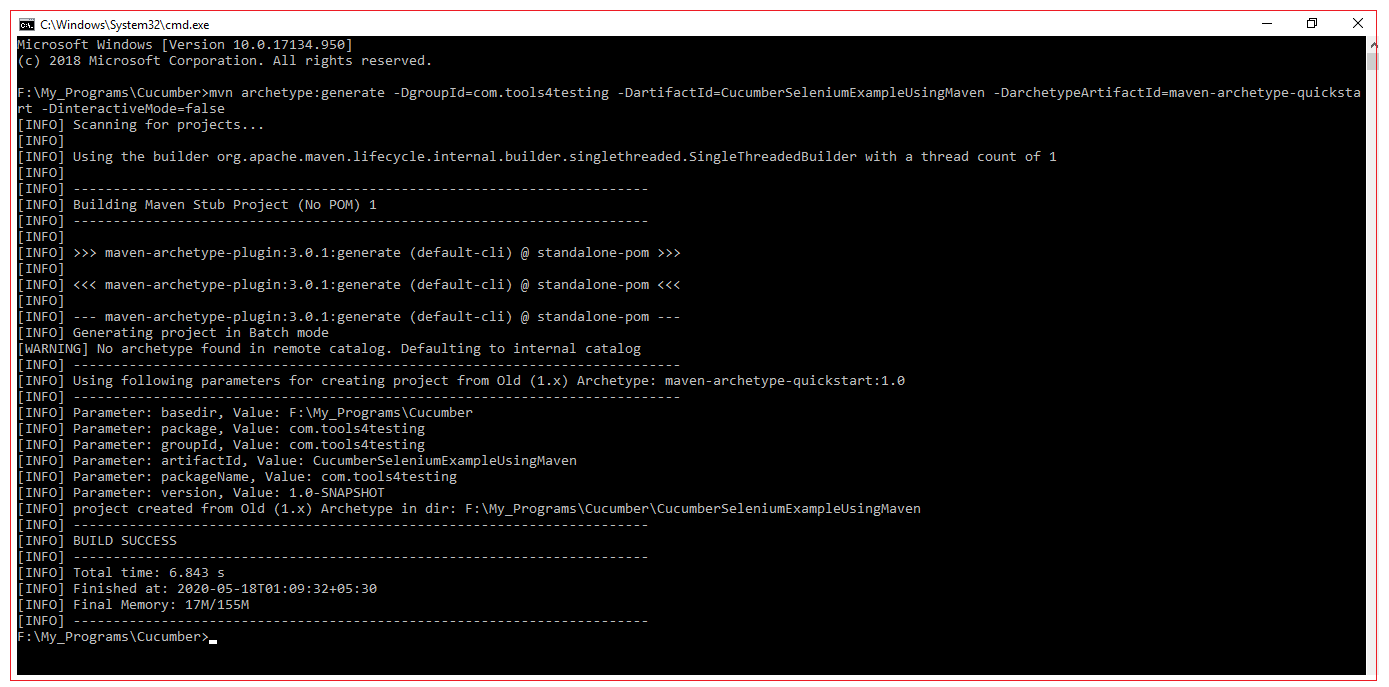
This command creates a new maven Java project with the name “CucumberSeleniumExampleUsingMaven”, with complete directory structure.
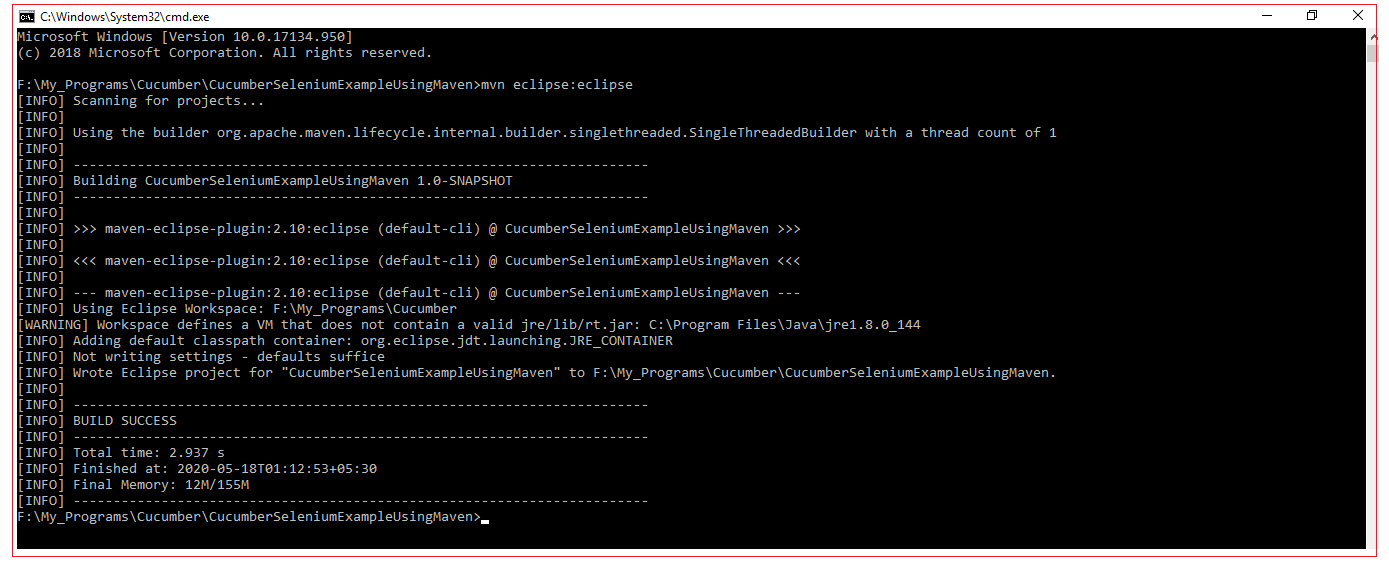
Step 2: Convert to eclipse project
To import Maven project into Eclipse IDE, in terminal, navigate inside “CucumberSeleniumExampleUsingMaven” project (folder should has pom.xml file), and issue mvn eclipse:eclipse command.
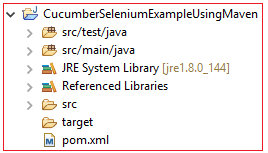
Import converted project into Eclipse IDE: In Eclipse IDE, Choose File –> Import –> General -> Existing Projects into Workspace –>Choose your project folder location. Done
Step 3: Create feature file
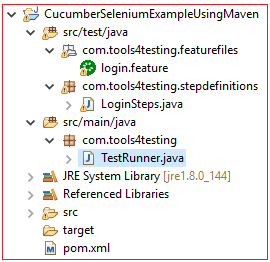
Create a java package com.tools4testing.featurefiles inside src/test/java. Then create a file login.feature file inside.
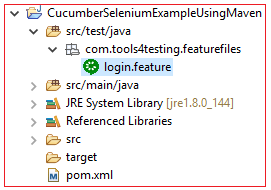
Add the below gherkin steps to login.feature file
Feature: Login
@single
Scenario: Successful Login to the page
Given I open Chrome browser
When I navigate to login page
And I click on login option
And I provide username as "manu.m@tools4testing.com" and password as "*****"
And I click on login button
Then Login success window should be displayed
Then I click on Close button on Login success window
Then I Close the browser
Please register to https://www.registration.tools4testing.com/ and get your login credentials
Step 4: Update pom.xml
After updating pom.xml, execute mvn eclipse:eclipse command (refer step2) to update the dependencies to the project. After command is executed successfully, refresh the project in eclipse.
pom.xml
<project xmlns="https://maven.apache.org/POM/4.0.0"
xmlns:xsi="https://www.w3.org/2001/XMLSchema-instance"
xsi:schemaLocation="https://maven.apache.org/POM/4.0.0 https://maven.apache.org/maven-v4_0_0.xsd">
<modelVersion>4.0.0</modelVersion>
<groupId>com.tools4testing</groupId>
<artifactId>CucumberSeleniumExampleUsingMaven</artifactId>
<packaging>jar</packaging>
<version>1.0-SNAPSHOT</version>
<name>CucumberSeleniumExampleUsingMaven</name>
<url>https://maven.apache.org</url>
<dependencies>
<dependency>
<groupId>org.assertj</groupId>
<artifactId>assertj-core</artifactId>
<version>3.10.0</version>
<scope>test</scope>
</dependency>
<!-- https://mvnrepository.com/artifact/org.seleniumhq.selenium/selenium-java -->
<dependency>
<groupId>org.seleniumhq.selenium</groupId>
<artifactId>selenium-java</artifactId>
<version>3.141.0</version>
</dependency>
<!-- https://mvnrepository.com/artifact/org.seleniumhq.selenium/selenium-chrome-driver -->
<dependency>
<groupId>org.seleniumhq.selenium</groupId>
<artifactId>selenium-chrome-driver</artifactId>
<version>3.141.0</version>
</dependency>
<!-- https://mvnrepository.com/artifact/org.seleniumhq.selenium/selenium-support -->
<dependency>
<groupId>org.seleniumhq.selenium</groupId>
<artifactId>selenium-support</artifactId>
<version>3.141.0</version>
</dependency>
<dependency>
<groupId>junit</groupId>
<artifactId>junit</artifactId>
<version>4.12</version>
<scope>test</scope>
</dependency>
<dependency>
<groupId>info.cukes</groupId>
<artifactId>cucumber-junit</artifactId>
<version>1.2.5</version>
<scope>test</scope>
</dependency>
<dependency>
<groupId>info.cukes</groupId>
<artifactId>cucumber-java</artifactId>
<version>1.2.5</version>
</dependency>
</dependencies>
</project>
Step 5: Download Selenium ChromeDriver
Open URL: https://sites.google.com/a/chromium.org/chromedriver/downloads
Based on your chrome browser version select the ChromeDriver version
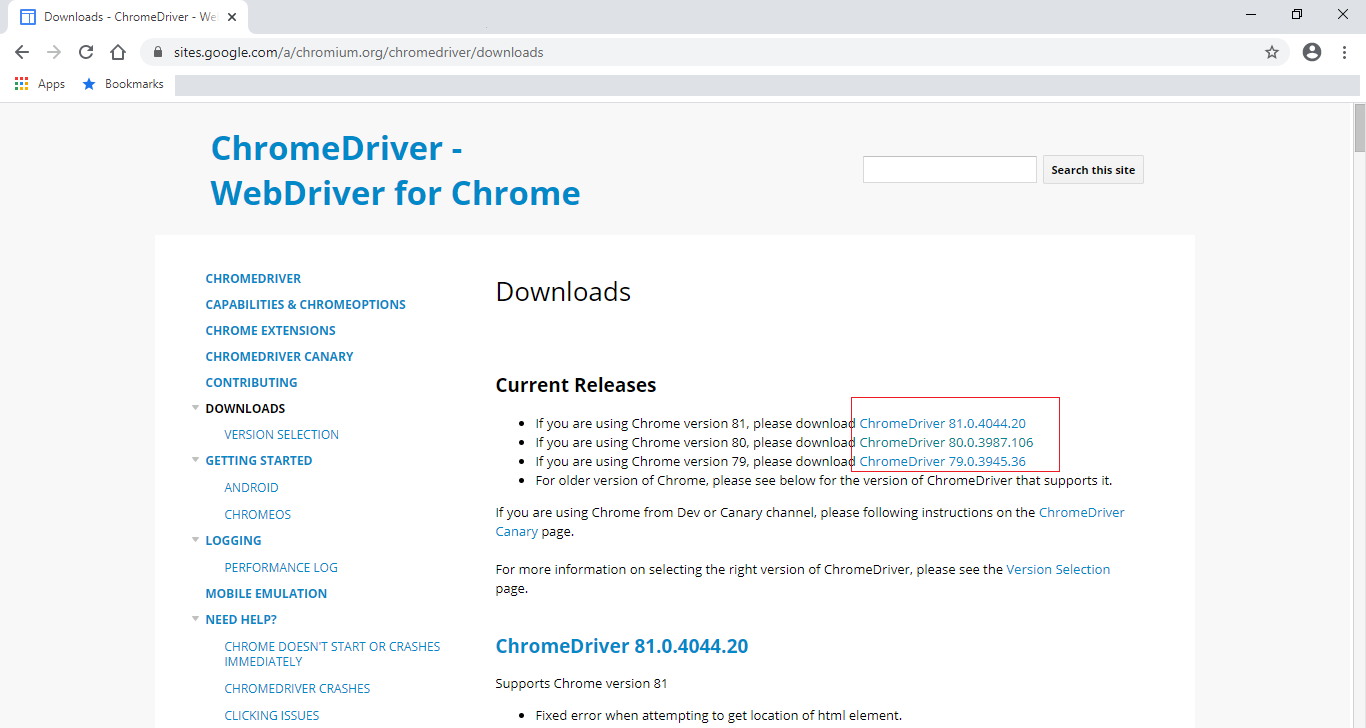
Based on your operating system, download the ChromeDriver, We have selected for Windows OS.
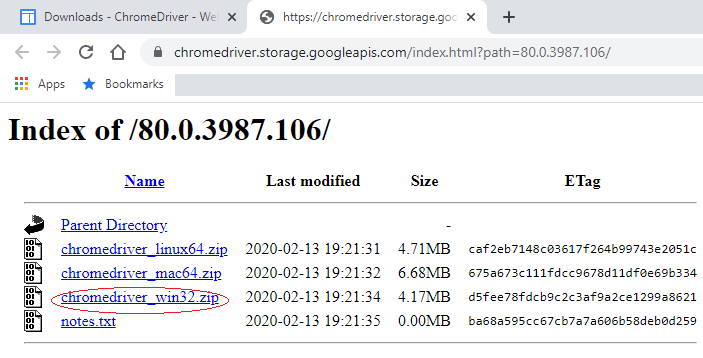
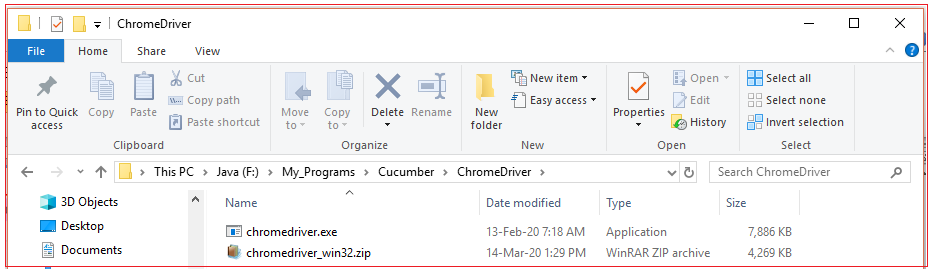
Please make note of this chromedriver.exe file path which we will use in our java code. Now our path is F:\My_Programs\Cucumber\ChromeDriver\chromedriver.exe
Step 6: Create step definitions
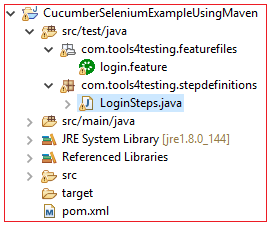
Create a java package com.tools4testing.stepdefinitions inside src/test/java. Then create a file LoginSteps.java file inside.
Add the below code to LoginSteps.java file
LoginSteps.java
package com.tools4testing.stepdefinitions;
import cucumber.api.java.en.Given;
import cucumber.api.java.en.Then;
import cucumber.api.java.en.When;
import java.time.Duration;
import org.openqa.selenium.By;
import org.openqa.selenium.WebDriver;
import org.openqa.selenium.WebElement;
import org.openqa.selenium.chrome.ChromeDriver;
import org.openqa.selenium.support.ui.ExpectedConditions;
import org.openqa.selenium.support.ui.FluentWait;
import org.openqa.selenium.support.ui.Wait;
public class LoginSteps {
WebDriver driver = null;
Wait<WebDriver> wait = null;
public void initializeDriver ( ) {
System.setProperty("webdriver.chrome.driver", "F:\\My_Programs\\Cucumber\\ChromeDriver\\chromedriver.exe");
driver = new ChromeDriver();
wait = new FluentWait(driver)
.withTimeout(Duration.ofSeconds(15))
.pollingEvery(Duration.ofSeconds(2))
.ignoring(Exception.class);
}
@Given("^I open Chrome browser$")
public void iOpenChromeBrowser() throws Throwable {
initializeDriver();
}
@When("^I navigate to login page$")
public void iNavigateToLoginPage() throws Throwable {
driver.get("https://www.registration.tools4testing.com/");
}
@When("^I click on login option$")
public void iClickOnLoginOption() throws Throwable {
driver.findElement(By.id("loginopener")).click();
}
@When("^I provide username as \"([^\"]*)\" and password as \"([^\"]*)\"$")
public void iProvideUsernameAsHiAndPasswordAsHi(String user, String password) throws Throwable {
// Focus on the dialog window by click on dialog window title
WebElement loginWindow;
loginWindow= wait.until(ExpectedConditions.visibilityOfElementLocated(By.xpath("//*[@id=\"ui-id-1\"]")));
loginWindow.click();
// Enter user name
driver.findElement(By.id("loginUsername")).sendKeys(user);
// Enter user password
driver.findElement(By.id("loginPassword")).sendKeys(password);
}
@When("^I click on login button$")
public void iClickOnLoginButton() throws Throwable {
// Click on the Login Button
driver.findElement(By.id("loginButton")).click();
}
@Then("^Login success window should be displayed$")
public void loginSuccessWindowShouldBeOpened() throws Throwable {
WebElement loginSuccessWindow;
loginSuccessWindow = wait.until(ExpectedConditions.visibilityOfElementLocated(By.xpath("//*[@id=\"ui-id-3\"]")));
loginSuccessWindow.click();
}
@Then("^I click on Close button on Login success window$")
public void clickOnCloseInLoginSuccessWindow() throws Throwable {
driver.findElement(By.xpath("//*[@id=\"loginSuccessDialog\"]/div/span/input")).click();
}
@Then("^I Close the browser$")
public void iCloseTheBrowser() throws Throwable {
//close the driver
driver.quit();
}
}
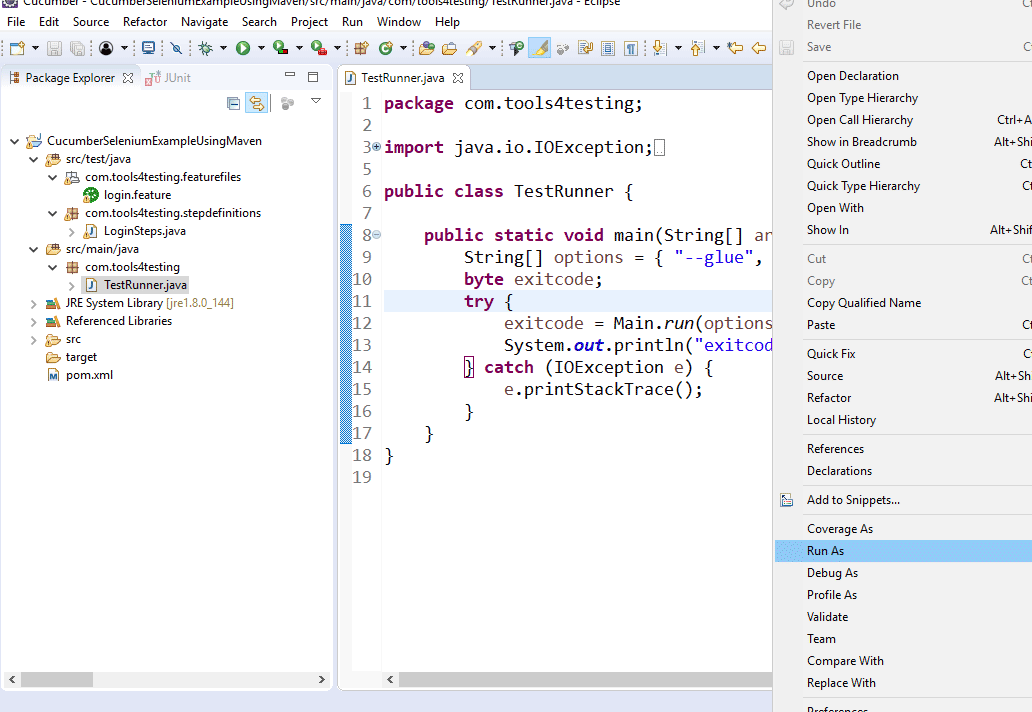
Step 6: Create Test Runner.
Create a java package com.tools4testing inside src/main/java. Then create a file TestRunner.java file inside.
Add the below code to LoginSteps.java file
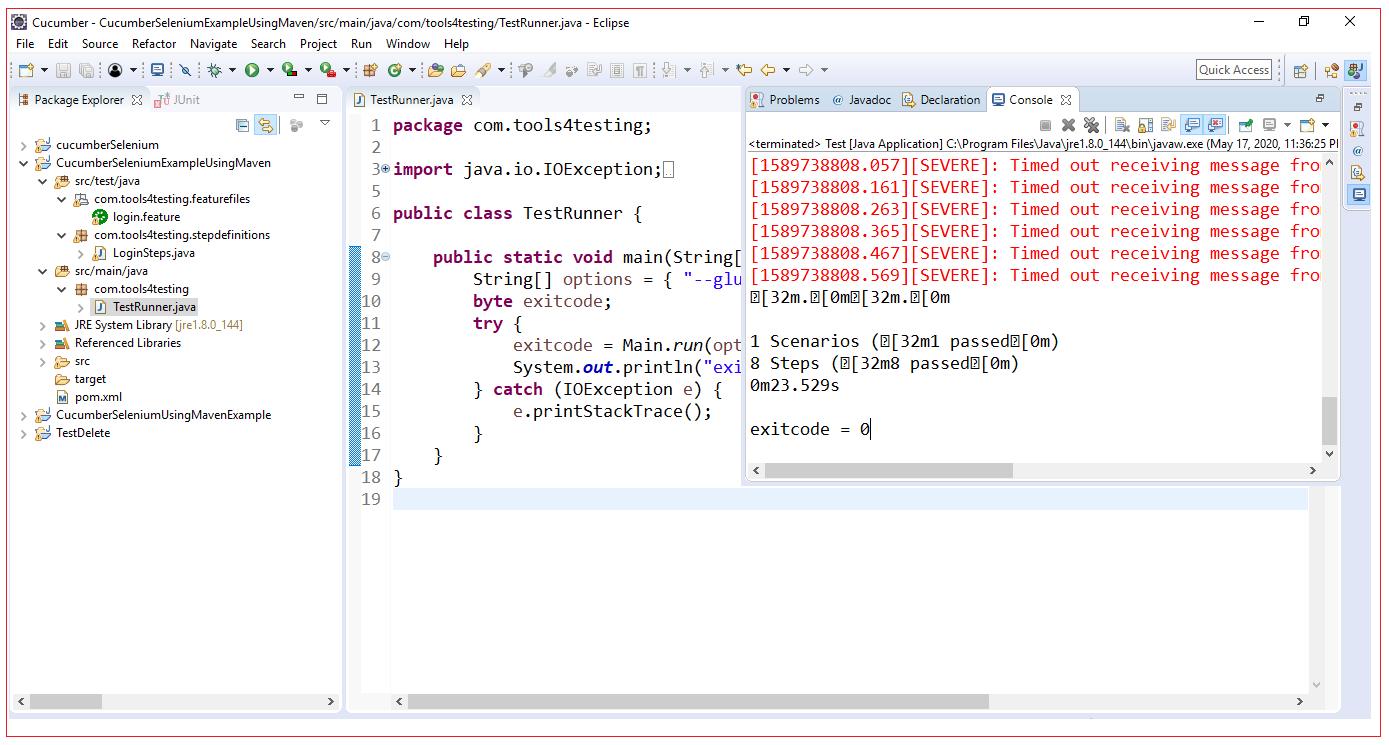
TestRunner.java
package com.tools4testing;
import java.io.IOException;
import cucumber.api.cli.Main;
public class TestRunner {
public static void main(String[] args) {
String[] options = { "--glue", "com/tools4testing/stepdefinitions", "src/test/java/com/tools4testing/featurefiles/login.feature" };
byte exitcode;
try {
exitcode = Main.run(options, Thread.currentThread().getContextClassLoader());
System.out.println("exitcode = " + exitcode);
} catch (IOException e) {
e.printStackTrace();
}
}
}
Step 6: Execute Test Runner
Right click on the Eclipse TestRunner java file and select Run As > Java Application.
Check the eclipse console to see the execution results
All Chapters
