
| ☰ See All Chapters |
Puppeteer Tutorial - Web Scraping with a Headless Browser
Puppeteer is an open source Node.js library developed by Google that was built in purpose of automating and simplifying frontend tests and development. Puppeteer provides a high-level API to communicate and control headless Chrome or Chromium over the DevTools Protocol. Puppeteer can be configured to run non-headless Chrome or Chromium also.
Using Puppeteer we can automate form submission, UI testing, keyboard and mouse events etc. We can scrape (automate) a Single-Page Applications (SPA) and generate pre-rendered content. As Angular and Angularjs applications are SPA applications, using puppeteer for automating angular and angularjs is a good choice.
Features of Puppeteer
The manual processes through the Chrome browser can be automated.
As puppeteer supports web page crawling, in turn it supports scraping the web. Crawling means saving a local static instance of a web page and using it offline without using actual web page from internet. Scraping means Extracting data from a specific website. The crawler leads the scraper, where it extracts the data requested.
It can captures screenshot of any web page and generates the image or PDF file of the screenshot.
It can automate the web form submission, UI testing, keyboard input, etc., with checkpoints.
It provides more control over the Chrome browser.
The default headless mode is very fast.
It supports web scraping.
Ability to measure rendering and load timing using Chrome performance analysis tools.
How do Puppeteers work?
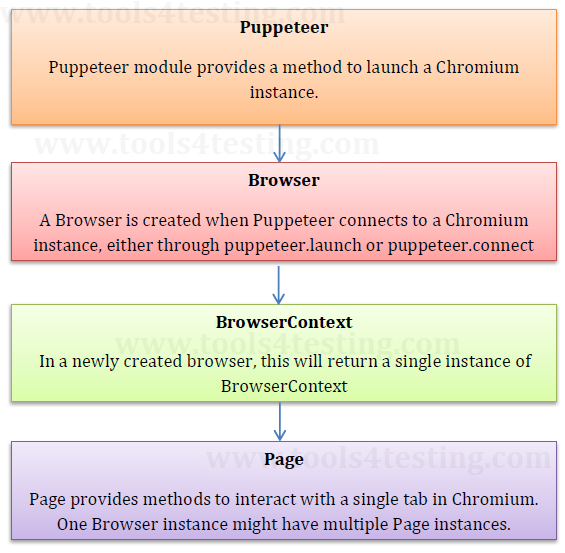
Puppeteer uses the Node JS library. The Node JS allows using the high-level APIs. The APIs are capable of controlling the Chrome browser over devtool protocol. By default, Puppeteer works with headless Chrome browsers but it can interact with headful Chrome browsers as well by changing the default configuration. Below is the high level puppeteer API hierarchy.
Node.js
Node.js is an asynchronous event-driven JavaScript runtime. Node.js also provides a rich library of various JavaScript modules which simplifies the development of web applications using Node.js to a great extent. Hence Node.js is a runtime environment and javascript library.
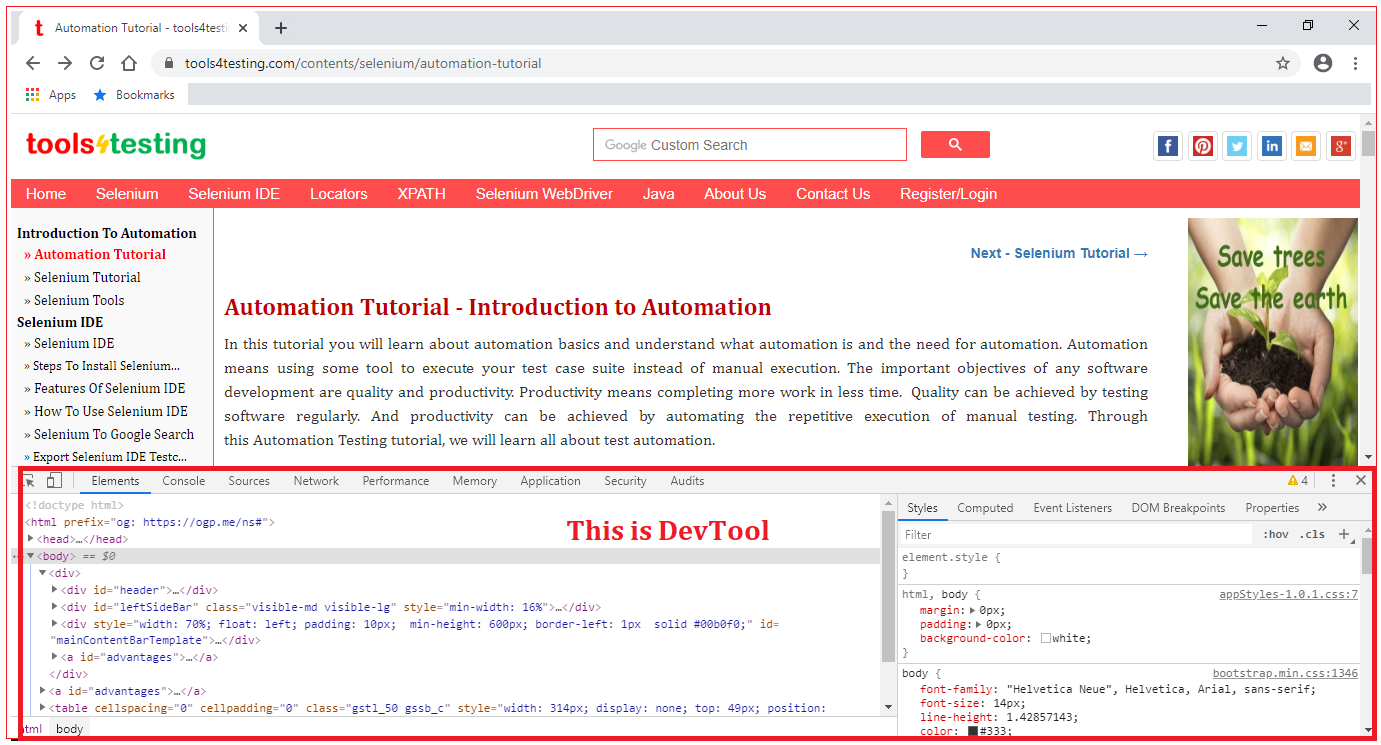
DevTools
There are many ways to open DevTools, because different users want quick access to different parts of the DevTools UI.
Press F12 to open DevTools
When you want to work with the DOM or CSS, right-click an element on the page and select Inspect to jump into the Elements panel. Or press Command+Option+C (Mac) or Control+Shift+C (Windows, Linux, Chrome OS).
When you want to see logged messages or run JavaScript, press Command+Option+J (Mac) or Control+Shift+J (Windows, Linux, Chrome OS) to jump straight into the Console panel.
Headless browsers
There are Operating Systems without GUI like Linux. We can do everything by executing commands on command line interface or terminal. Like this there are browsers without GUI and can be done everything without using GUI. Such browsers are called as Headless browsers.
Let’s say there are two inputs and one submit button on web page. When we enter value to these two inputs and click on submit we get the sum of those two values. This sum is calculated by the below javascript function:
function getSum(a, b) { return a+b; } |
Now to test this sum functionality do you think GUI is really necessary? Fact is not necessary. If we test the getSum() javascript function, it would be enough. To test this javascript function we can just use headless browser like Chromium browser.
As here GUI is not considered, saves a lot of CPU, GPU and Memory resources. This increases the testing speed and performance.
Puppeteer vs. Selenium
Below table lists down the differences between Puppeteer and Selenium
Puppeteer | Selenium |
Puppeteer is based on Chromium, a version of the famous browser Google Chrome, and therefore works only with Chrome. | Supports multiple browsers. |
Supported programming language is Node.js | Supports Java, C#, Ruby, Python, Perl, PHP, Javascript, Javascript (Node JS), Haskell, Dart, TCL, Objective - C |
Puppeteer provides a high-level API to control headless Chrome over the DevTools Protocol. | It is based on external drivers and basically “drives” the websites according to the developer’s commands. |
Controls Chrome browser | Automates browsers |
Faster than Selenium | A bit slower than Puppeteer |
What both Puppeteer and Selenium are missing?
If it is necessary to configure wait time for test cases, have to configure the wait time for the test cases individually and separately. Both Selenium and Puppeteer don’t have intelligent automatic smart waiting capability.
Video Recording functionality is not supported from both.
Image processing is not supported. Both supports only taking screenshots but comparing the screenshots of different executions is not supported. Screenshots of different executions should be compared manually.
Schedulers are not available and scheduler jobs cannot be tested.
There is no support to integrate with SMTP and messaging servers.
We can’t perform database testing.
Advantages of puppeteer
Supports intercepting web requests and responses. By intercepting the request/responses from the webpage, we can update, modify and log it. If you are only interested in getting only part of the web page, if you want to avoid large image files to be loaded, or if you want only text items to be loaded, interceptors can be used on responses. If you want to hide, browser/user specific details like operating system, time zone, language, IP address, interceptors can be used on requests.
By using interceptors we can avoid using proxy servers / VPNs for some extent as proxy servers / VPNs are mainly used to avoid exposing user or browser details to the network.
By using interceptors we can load only text by avoiding loading large images thus reducing data usage.
We can scrape (automate) a SPA (Single-Page Application) and generate pre-rendered contents.
Puppeteer does not use any external driver or libraries but a real browser in headless Mode.
How to install Puppeteer
Puppeteer installation involves below 3 installation steps.
Node.js installation
puppeteer installation
puppeteer-core installation
Follow our next chapter How to install Puppeteer for detailed installation guide.
Puppeteer example
Below example will launch www.tools4testing.com and take screenshot of it. For detailed steps to create this example follow our chapter Puppeteer Example
Example using javascript
const puppeteer = require('puppeteer');
async function example() { const browser = await puppeteer.launch(); const page = await browser.newPage(); await page.setViewport({ width: 1366, height: 768}); await page.goto('https://tools4testing.com/'); await page.screenshot({ path: 'example.png' });
await browser.close(); }
example(); |
Below example will execute the above example in non-headless mode.
const puppeteer = require('puppeteer');
async function example() { const browser = await puppeteer.launch({headless : false}); const page = await browser.newPage(); await page.setViewport({ width: 1366, height: 768}); await page.goto('https://tools4testing.com/'); await page.screenshot({ path: 'example.png' });
await browser.close(); }
example(); |
Example using typescript
Both the above examples used javascript as the coding language. We can also use typescript for puppeteer automation. Below is same example using typescript. For detailed steps to create this example follow our chapter Puppeteer Example Using Typescript
import * as puppeteer from 'puppeteer';
async function example() { const browser = await puppeteer.launch(); const page = await browser.newPage(); await page.setViewport({ width: 1366, height: 768}); await page.goto('https://tools4testing.com/'); await page.screenshot({ path: 'example.png' });
await browser.close(); }
example(); |
All Chapters
